Ever thought about what’s in your pet’s shampoo? Many pet owners are switching to homemade shampoos. They find these DIY options are just as good and healthier for their pets.
Making your own pet shampoo has many perks. It keeps your pet away from harmful chemicals and supports natural grooming. You can also make your pet’s coat look better and save money. Here, we’ll show you a simple recipe to make at home.
Why Use Homemade Shampoo for Pets?
Creating homemade shampoo for pets has many benefits. It’s not just about saving money. It also lets you tailor care to your pet’s specific needs, like allergies or sensitivities.
Benefits of DIY Shampoo
One key benefit is the ability to customize the shampoo. You can use different ingredients for various skin issues. This ensures your pet gets the right care. Plus, homemade shampoos are often gentler, reducing irritation.
Avoiding Harmful Chemicals
Commercial shampoos often have harmful chemicals. These can irritate your pet’s skin or cause allergic reactions. Making your own shampoo lets you avoid these chemicals. Instead, you can use natural ingredients that are safer for your pet.
Cost-Effectiveness
DIY shampoos are also a cost-effective option. They save you money by not relying on expensive commercial brands. With simple kitchen ingredients, you can make effective shampoos that keep your pet clean and healthy without spending a lot.
Essential Ingredients for Pet Shampoo
Making a safe and effective DIY pet shampoo means picking the right ingredients. Knowing what’s needed is key for a gentle yet thorough clean. This ensures your furry friend stays happy and healthy.
Natural Cleaning Agents
Natural cleaners are the heart of homemade shampoo. Baking soda and Castile soap get rid of dirt and smells without harming your pet’s skin. They make bath time a joy for pets and their owners alike.
Moisturizers and Conditioners
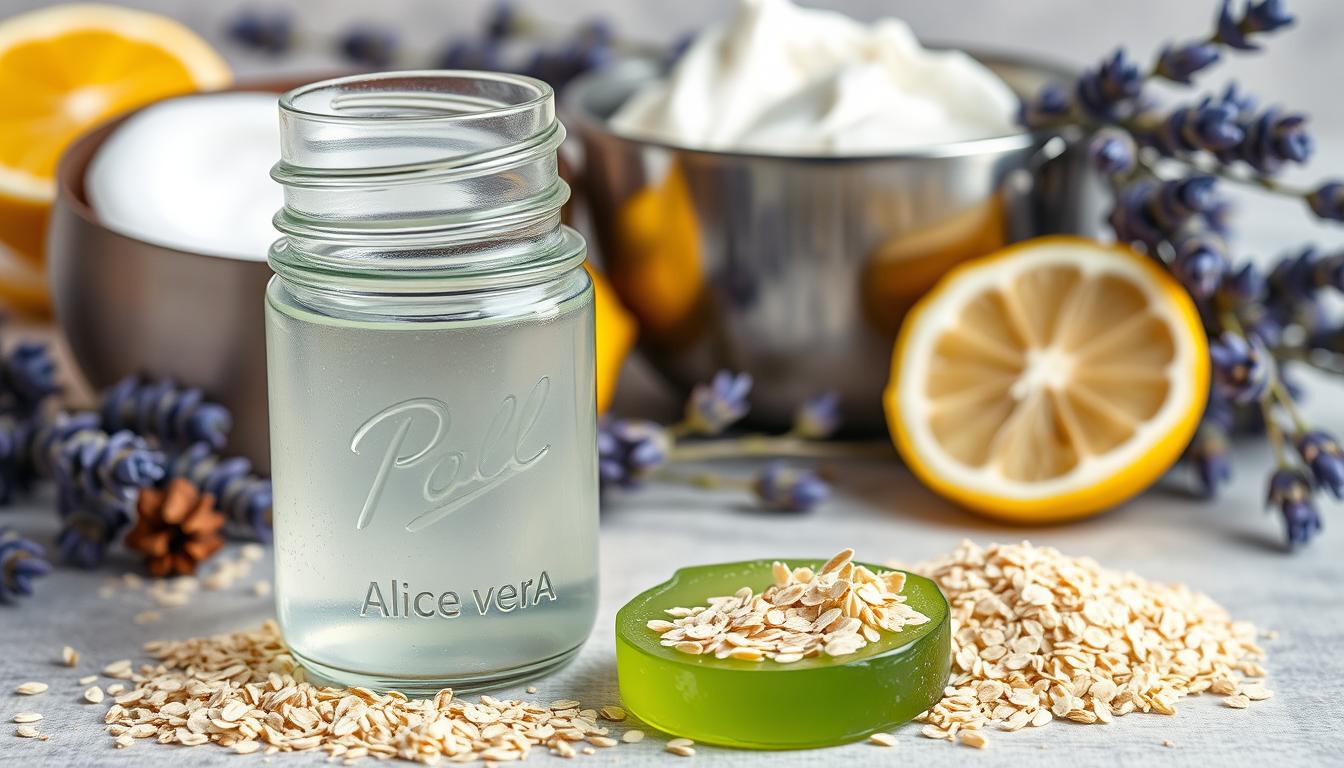
Adding a pet moisturizer is vital for your pet’s coat health. Aloe vera and coconut oil are great for keeping the coat shiny and moist. They not only hydrate but also make the coat soft and easy to manage.
Essential Oils for Scent
Using natural essential oils can make pet shampoo scents wonderful. Lavender and chamomile oils offer calming smells and may have health benefits. They make your pet smell great and help reduce stress during baths.

How to Determine Your Pet’s Skin Type
Knowing your pet’s skin type is key to picking the right homemade shampoo. Each skin type has its own needs. Whether your pet has dry, oily skin, or sensitivities, knowing this helps keep them healthy.
Recognizing Dry Skin
Dry skin in pets shows signs like flaking, redness, and itchiness. You might see your pet scratching a lot or looking irritated. Dry skin can come from low humidity, diet, or health issues. Regular grooming can help. Watch your pet’s skin to make sure they’re okay.
Identifying Oily Skin
Oily pet skin feels greasy and smells bad. Fur might look shiny or dirty, trapping dirt and allergens. Oily skin can be due to hormones or infections. You need a shampoo that removes oil without irritating the skin.
Understanding Sensitivities
Pet skin sensitivities can be different for everyone. Some pets don’t like certain ingredients in shampoos. When making homemade shampoo, choose natural ingredients carefully. Watch for any bad reactions and adjust your shampoo as needed. Knowing about sensitivities is important for your pet’s health.
Easy DIY Pet Shampoo Recipes
Making your own pet shampoo is rewarding. It lets you tailor care for your pet’s needs. Try these simple recipes using natural ingredients. They include oatmeal and aloe vera for dry skin, coconut oil and Castile soap for gentle cleaning, and baking soda to remove odors.
Oatmeal and Aloe Vera Shampoo
Oatmeal soothes sensitive or dry skin, making it great for pets. Adding aloe vera boosts hydration and reduces irritation. Here’s how to make it:
- 1 cup of finely ground oatmeal
- 1/2 cup of aloe vera gel
- 4 cups of warm water
Combine all ingredients well. Apply to your pet’s fur, then rinse thoroughly. Your pet will thank you.
Coconut Oil and Castile Soap Shampoo
This shampoo is gentle yet effective. It’s perfect for pets with normal to oily skin. Here’s what you need:
- 1 cup of Castile soap
- 1/4 cup of coconut oil
- 1/2 cup of water
Mix until smooth. Apply to your pet’s coat, lather gently, and rinse. It cleans and conditions, leaving fur soft and shiny.
Baking Soda and Water Mixture
This quick mix is great for a fast clean. It uses baking soda for pets to eliminate odors. Just mix:
- 1/2 cup of baking soda
- 1 cup of water
Massage it into your pet’s coat, especially smelly areas. Rinse well for a fresh scent.
| Recipe | Main Ingredients | Best For |
|---|---|---|
| Oatmeal and Aloe Vera Shampoo | Oatmeal, Aloe Vera | Dry or Sensitive Skin |
| Coconut Oil and Castile Soap Shampoo | Coconut Oil, Castile Soap | Normal to Oily Skin |
| Baking Soda and Water Mixture | Baking Soda, Water | Odor Elimination |
Equipment Needed to Make Pet Shampoo
Making your own pet shampoo needs some key tools. The right equipment makes the process smoother and keeps your pet safe. Here’s what you’ll need to make your custom shampoo.
Mixing Bowls and Utensils
Mixing bowls are crucial for blending your ingredients well. Choose stainless steel or glass bowls to avoid odors and reactions. Use spoons or spatulas for mixing, and silicone spatulas for scraping the bowl.
Storage Containers
After making your shampoo, storing it properly is key. Dark glass bottles are best because they block light. This helps keep the ingredients fresh. Make sure the containers are clean and dry before filling them.
Measuring Tools
Getting the right amounts is vital for your shampoo’s quality. Use measuring cups and spoons for precise mixing. These tools help you create a balanced shampoo that works well.

Step-by-Step Guide to Making Pet Shampoo
Making your own pet shampoo is a detailed process. This guide will help you make pet shampoo step-by-step. It ensures your pet gets a shampoo that meets their needs. Follow these steps for a safe and effective DIY grooming experience.
Preparing Your Workspace
First, make sure your workspace is clean and organized. Collect all the materials you need to avoid any delays. A clean area is key to making a safe shampoo. Use a flat surface for mixing and have a spot ready for your finished product.
Mixing Ingredients
With your workspace set up, start mixing the ingredients. Stick to your recipe closely. You’ll need natural cleaners, moisturizers, and essential oils. Mix them in the right order for the best texture and results.
Testing pH Levels
After mixing, it’s time to check the pH levels. Use pH strips or a meter to see if it’s between 6 and 8. Keeping the pH in this range prevents skin irritation and keeps your pet’s coat healthy.

| Ingredient | Purpose | pH Level |
|---|---|---|
| Castile Soap | Natural cleanser | 7.5-8.0 |
| Aloe Vera | Moisturizing agent | 5.0-6.5 |
| Oatmeal | Soothing property | 6.0-7.0 |
| Coconut Oil | Conditioning agent | 7.0-8.0 |
How to Apply Shampoo on Pets
It’s important to apply pet shampoo correctly for a good bath experience. Dogs and cats need different techniques to stay comfortable and safe. Knowing these methods makes bathing easier and more enjoyable for everyone.
Bathing Techniques for Dogs
When bathing dogs, be gentle and calm. Start by wetting their coat with lukewarm water. Mixing shampoo with water in a container helps avoid messes.
Work the shampoo into their coat gently, making sure to avoid sensitive spots. Rinse well to remove all shampoo residue.
Bathing Techniques for Cats
Cats can be tricky to bathe because they’re independent. Begin in a quiet place to reduce stress. Use a comfortable sink or tub for them.
Wet their coat carefully, avoiding their face. Use small amounts of shampoo to keep control. Make sure to rinse well to avoid any irritation.
Avoiding Sensitive Areas
Keep your pet safe by avoiding sensitive areas. Don’t put shampoo near their eyes, ears, or nose. These spots can easily get irritated.
Be extra careful around these areas when bathing. This ensures your pet’s safety and comfort during the bath.

Rinsing and Drying Your Pet
Proper rinsing and drying are key to good pet care. It’s important to rinse pets well to remove shampoo that can irritate their skin. Drying them safely also helps prevent chilling and keeps them comfortable after a bath.
Effective Rinsing Techniques
Here are some tips for rinsing pets effectively:
- Use lukewarm water to keep your pet comfortable.
- Start from your pet’s neck and work downwards, allowing water to flow away from the face.
- Massage into the fur to release all shampoo remnants.
- Rinse thoroughly until the water runs clear, confirming the removal of all soap.
Choosing the Right Towel
Choosing the right towel is important for drying pets safely. Look for towels that are absorbent and soft to avoid irritating the skin. Microfiber towels are great because they soak up water quickly and are gentle on fur. Consider these factors:
- Size: Choose a towel large enough to wrap around your pet.
- Material: Opt for absorbent materials like cotton or microfiber.
- Ease of Use: Select towels that can withstand multiple washes.
Using a Dryer Safely
Using a dryer can make drying faster and keep your pet comfortable. Here’s how to use a dryer safely:
- Select a pet-safe blow dryer designed with lower heat settings.
- Keep the dryer at least 12 inches away from your pet’s body.
- Move the dryer continuously to avoid overheating any one area.
- Monitor your pet for signs of discomfort during the drying process.
Tips for Bath Time Success
Turning bath time into a positive experience is key for both you and your pet. It involves strategies that focus on your pet’s comfort and ease. Here are some tips to make bath time better for your pet.
Creating a Calm Environment
Creating a peaceful atmosphere is vital to reduce anxiety. Dim lights and soft music can make it soothing. Make sure the bathroom is quiet and free from distractions. This makes your pet feel safe and more likely to enjoy the bath.
Using Treats as Incentives
Using treats can motivate your pet during bath time. Treats help your pet see baths as positive. Rewarding them at different times can make bath time a fun bonding experience.
Keeping Bath Time Short
Long baths can stress and discomfort your pet. To keep them calm, make baths short but effective. A quick bath routine helps your pet feel more relaxed and less stressed.
Common Mistakes to Avoid
When making a DIY pet shampoo, knowing common mistakes is key. These errors can harm your pet’s health and comfort. Here are some mistakes pet owners should avoid.
Overusing Ingredients
One big mistake is using too much of certain ingredients. This can dry out or irritate your pet’s skin. It’s important to stick to the right amounts to prevent problems. Too much of natural ingredients like oils can make things worse, not better.
Ignoring Allergies or Sensitivities
Not checking for allergies can cause serious problems. Many pets have sensitivities that owners might not know about. Always test a small area before using a new shampoo. This way, you can avoid using things that might make your pet sick.
Skipping the Rinse
Some pet owners forget to rinse well, thinking the shampoo is enough. But, not rinsing can leave soap on your pet’s skin, causing irritation. Make sure to rinse thoroughly to keep your pet comfortable and healthy.
Storing Your DIY Pet Shampoo
Storing your homemade pet shampoo right is key to keeping it good. Following the best practices helps it last longer and work better. This way, you can take great care of your pet without any trouble. Here are some tips to keep your shampoo fresh and effective.
Best Practices for Storage
Store your homemade shampoo in a cool, dark spot. This keeps the ingredients from breaking down. Use dark containers to block out light. Always close the container tightly to avoid contamination.
Shelf Life Considerations
The shelf life of your DIY shampoo depends on the ingredients. Most homemade shampoos last 1-3 months. Be aware of any ingredients that might spoil faster when making your shampoo.
Signs of Spoilage
Check your shampoo often for signs of spoilage. Look for changes in smell, color, or texture. A bad smell means it’s time to throw it away. Also, if it separates or clumps, it’s not safe to use anymore.
Frequency of Bathing Your Pet
Finding the right time to bathe your pet is key to keeping them healthy and happy. Things like their breed, how active they are, and their coat type matter a lot. Knowing these helps you pick the best bath schedule for your pet.
Factors Affecting Bathing Frequency
How active your pet is affects how often they need a bath. Pets that love to play outside might need baths more often. Also, the length of their fur can change how often they need a bath. Long fur can get matted and dirty easily.
General Recommendations by Breed
Every breed has its own grooming needs. For example, Poodles and Bichon Frises need baths often to keep their fur fluffy. But Bulldogs might not need baths as often because their skin makes natural oils.
Understanding Your Pet’s Needs
Knowing your pet’s personality and lifestyle helps you find the right bath schedule. Pets with sensitive skin might need gentle baths less often. Those with allergies might need baths more often. Watching how your pet reacts to baths helps you find the perfect frequency.